背景 次の要件を満たすmdbookの静的サイトを作る必要があった。
安全性 安さ無料ホスティングがベスト 少しコストがかかるのはOK Basic認証つけないならNetlify一択だが、Basic認証が必要なので、AWSで実装した。
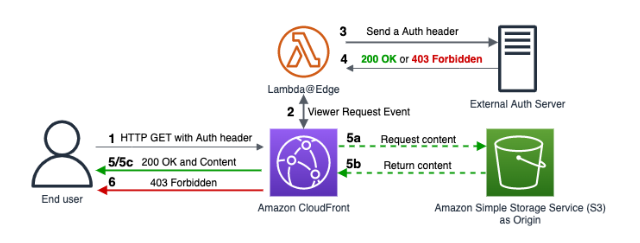
設計 ファイルはS3に置いておく OAC(オリジンアクセスコントロール)でCloudFront DistributionとS3をつなげる 認証はBasic認証で、CloudFront Distributionの配布前に、lambda@edgeで認証を行う 下図のExternal Auth Serverまでは用意しない
AWSの設定 S3の設定 S3のバケットを作成する。
バケット名: my-mdbook リージョン: ap-northeast-1 ACL: 無効 Block Public Access: 全てblock バケットポリシー: なし(後に) アップロード:
その後にmdbook buildでbuildして、bookフォルダをuploadする また、次のindex.htmlをドキュメントルートにアップロードする 1
2
3
4
5
6
7
8
9
10
11
12
13
14
15
16
17
18
19
20
21
22
23
24
<!DOCTYPE html>
< html lang = "ja" >
< head >
< meta charset = "UTF-8" >
< meta name = "viewport" content = "width=device-width, initial-scale=1.0" >
< title > Hello</ title >
< style >
/* ダークモード対応の最小限のスタイル */
@ media ( prefers-color-scheme : dark ) {
body {
background-color : #222 ;
color : #eee ;
}
a {
color : white ;
}
}
</ style >
</ head >
< body >
< h1 > Hello</ h1 >
< a href = "/book/index.html" > book</ a >
</ body >
</ html >
CloudFrontの設定 CloudFrontのディストリビューションの作成する。
AWSコンソールでCloudFrontにアクセス 「ディストリビューションを作成」をクリック 設定:オリジンドメイン名: my-mdbook.s3.amazonaws.com オリジンアクセス: OAC ビューアープロトコルポリシー: Redirect HTTP to HTTPS キャッシュポリシー: CachingDisabled デフォルトルートオブジェクト: index.html S3のOACを設定 S3のバケットポリシーをOACに合わせて、次のように変更する NOTE: arn:aws:cloudfront::123456789012:distribution/EXAMPLE123の値を適切なものに変える 1
2
3
4
5
6
7
8
9
10
11
12
13
14
15
16
17
18
{
"Version" : "2012-10-17" ,
"Statement" : [
{
"Effect" : "Allow" ,
"Principal" : {
"Service" : "cloudfront.amazonaws.com"
},
"Action" : "s3:GetObject" ,
"Resource" : "arn:aws:s3:::my-mdbook/*" ,
"Condition" : {
"StringEquals" : {
"AWS:SourceArn" : "arn:aws:cloudfront::123456789012:distribution/EXAMPLE123"
}
}
}
]
}
Lambdaを作成 AWS Lambdaに新しい関数を作成する。
言語: Python 3.9 Region: us-east-1LambdaをEdge側でデプロイするには、us-east-1にする必要がある ID, PWは適宜変更する /などのフォルダにアクセスしたらindex.htmlに変える 1
2
3
4
5
6
7
8
9
10
11
12
13
14
15
16
17
18
19
20
21
22
23
24
25
26
27
28
29
30
31
32
33
34
35
36
37
38
39
40
41
42
43
44
45
46
47
48
49
50
51
52
53
54
import base64
USERNAME = "admin"
PASSWORD = "password"
def lambda_handler ( event , context ):
request = event [ "Records" ][ 0 ][ "cf" ][ "request" ]
headers = request [ "headers" ]
# 認証ヘッダーを取得
auth_header = headers . get ( "authorization" , [{}])[ 0 ] . get ( "value" , "" )
# 認証ヘッダーが空または形式が不正な場合
if not auth_header . startswith ( "Basic " ):
return generate_401_response ()
# Basic の後の部分を取得してデコード
try :
auth_value = auth_header [ 6 :] # "Basic " の後の部分
decoded_auth = base64 . b64decode ( auth_value ) . decode ( 'utf-8' )
username , password = decoded_auth . split ( ':' )
# ユーザー名とパスワードを検証
if username == USERNAME and password == PASSWORD :
# 認証成功時に `index.html` の処理を追加
request [ "uri" ] = rewrite_uri ( request [ "uri" ])
return request
except Exception :
# デコードエラーなどの例外処理
pass
# 認証失敗
return generate_401_response ()
def rewrite_uri ( uri ):
"""
フォルダにアクセスされた場合、index.html にリダイレクト
"""
if uri . endswith ( '/' ):
return uri + "index.html"
elif '.' not in uri : # 拡張子がない場合(フォルダの可能性あり)
return uri + "/index.html"
return uri
def generate_401_response ():
return {
"status" : "401" ,
"statusDescription" : "Unauthorized" ,
"headers" : {
"www-authenticate" : [{ "key" : "WWW-Authenticate" , "value" : 'Basic realm="Please enter your credentials"' }],
"content-type" : [{ "key" : "Content-Type" , "value" : "text/html" }]
},
"body" : "Please enter your username and password to access this content."
}
LambdaのIAM Roleの修正 LambdaをEdgeで動かすには、IAM Roleの信頼されたエンティティを修正する必要がある IAM > Role > 信頼関係 > 信頼されたエンティティで、次のJSONに修正する 1
2
3
4
5
6
7
8
9
10
11
12
13
14
15
{
"Version" : "2012-10-17" ,
"Statement" : [
{
"Effect" : "Allow" ,
"Principal" : {
"Service" : [
"lambda.amazonaws.com" ,
"edgelambda.amazonaws.com" // <- 追加
]
},
"Action" : "sts:AssumeRole"
}
]
}
Lambdaのデプロイ Lambda > アクション > CloudFront でデプロイをする。
設定ディストリビューション: 作ったDistributionを選択する キャッシュ動作: * CloudFront イベント: Viewer Request 権限周りでエラーが出た場合マネージメントコンソールをリロードする リロードしないと設定がIAMの修正の設定が反映されない事があるため デプロイ初回: 新しいCloudFrontトリガーの設定 2回目以降: この関数で既存のCloudFrontトリガーを使用 アクセステスト CDNのURLにアクセスして動作確認をする https://xxxxxxxxxxxx.cloudfront.net/とかCICDの設定 IAMロールの注意 IAMロールには2つの側面があるので注意。
信頼ポリシー(Trust policy)「誰がこのロールを使っていいか」 例: repo:3265/xxx:ref:refs/heads/main のみOK アクセス許可ポリシー(Permissions policy)「このロールを使って何ができるか」 例: S3 にファイルを Put/Delete/List できる など OIDCプロバイダの作成 IAM > IDプロバイダ > 「プロバイダを追加」 条件プロバイダのタイプ: OIDC プロバイダのURL: https://token.actions.githubusercontent.com 対象者(クライアントID): sts.amazonaws.com IAMロールの作成 IAM > ロール > 新規作成 条件エンティティタイプ: ウェブエンティティプロバイダー: https://token.actions.githubusercontent.com Audience: sts.amazonaws.com Github組織: ur username repository: rmc branch: main 許可ポリシー: AmazonS3FullAccess Role名: rmc-mdbook-github-role リポジトリ側の設定 .github/workflow/deploy.yamlを用意する後はpushでデプロイされる 1
2
3
4
5
6
7
8
9
10
11
12
13
14
15
16
17
18
19
20
21
22
23
24
25
26
27
28
29
30
31
32
33
34
35
36
37
38
39
40
41
42
43
name : Build and Deploy mdBook to S3 via OIDC
on :
push :
branches :
- main # ← 必要に応じて変更
permissions :
id-token : write
contents : read
jobs :
deploy :
runs-on : ubuntu-latest
steps :
- name : リポジトリをチェックアウト
uses : actions/checkout@v3
- name : Rust環境と mdBookツールのインストール
run : |
sudo apt-get update
sudo apt-get install -y curl
curl -sSL https://sh.rustup.rs | sh -s -- -y
source $HOME/.cargo/env
cargo install mdbook
cargo install mdbook-mermaid
cargo install mdbook-katex
- name : mdBook をビルド
run : |
source $HOME/.cargo/env
mdbook build
- name : AWS OIDC 認証
uses : aws-actions/configure-aws-credentials@v2
with :
role-to-assume : arn:aws:iam::<YOUR_AWS_ACCOUNT_ID>:role/<YOUR_ROLE_NAME>
aws-region : ap-northeast-1 # 東京リージョン(必要に応じて変更)
- name : book フォルダごと S3 にアップロード
run : |
aws s3 sync book/ s3://XXX/book --delete
参考文献